Why Is My CPU Overheating? Causes & How to Reduce CPU Temperature (2026 Guide)
Learn why your CPU is overheating and discover the best ways to reduce CPU temperatures. Step-by-step troubleshooting guide for gaming PCs and laptops.
Enjoying this? Sign up to earn credits just for reading. Create free account
Introduction
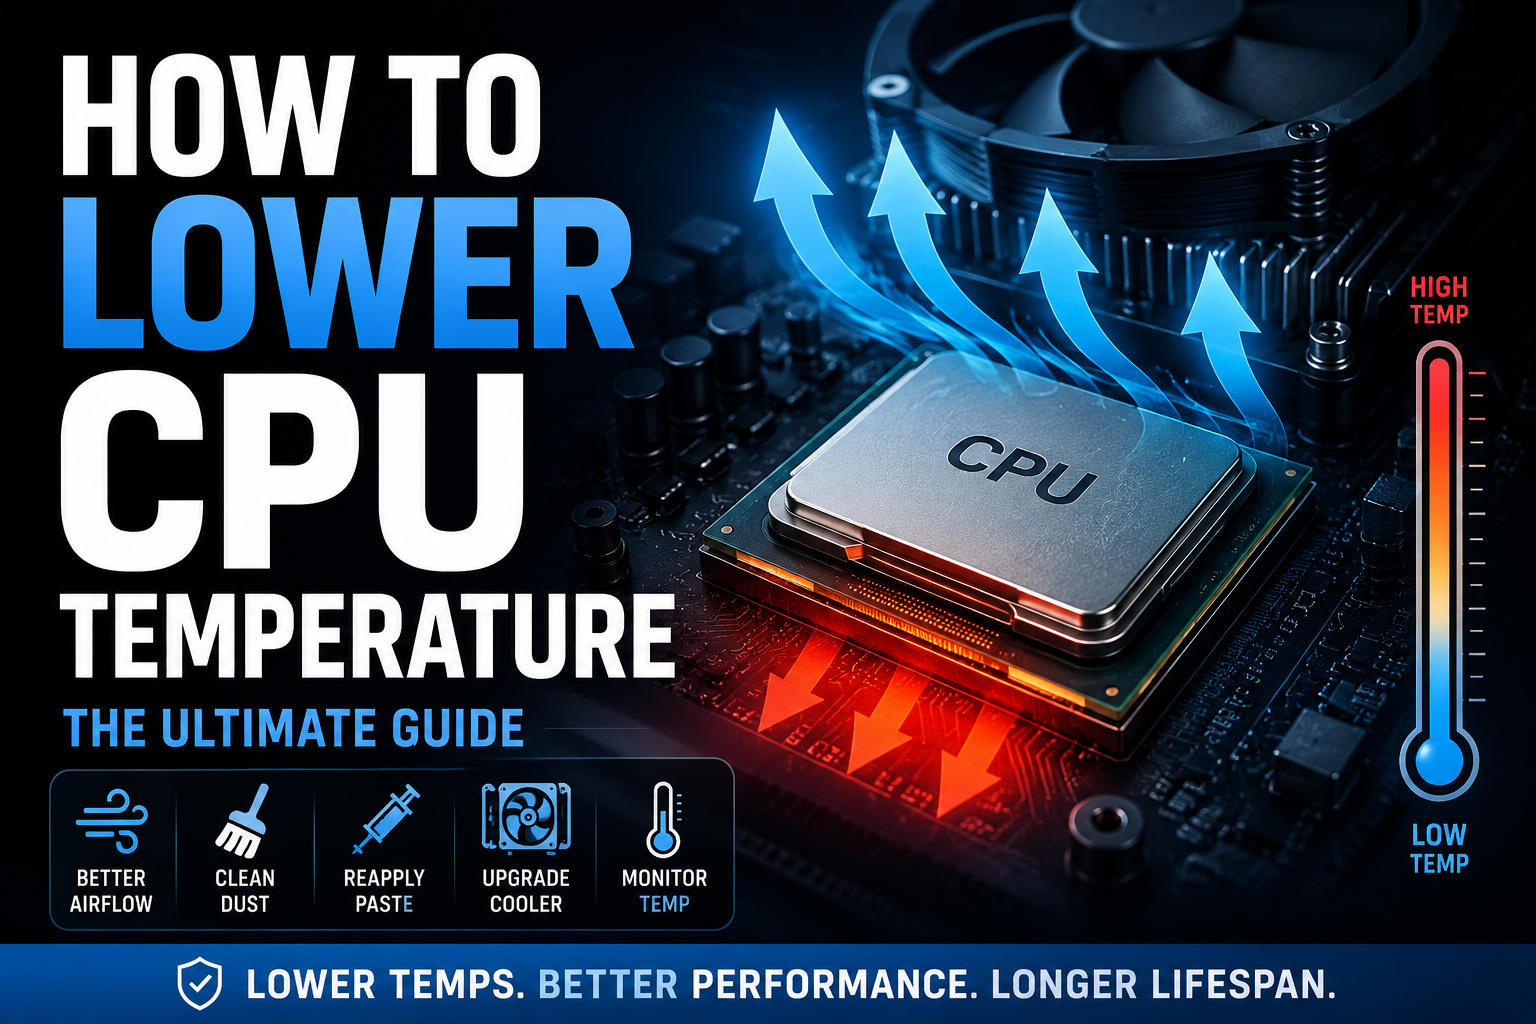
CPU overheating can cause crashes, slowdowns, and hardware damage, but with the right diagnosis and simple software or hardware fixes, you can keep your processor running cool, stable, and at peak performance.
What Is a Safe CPU Temperature?
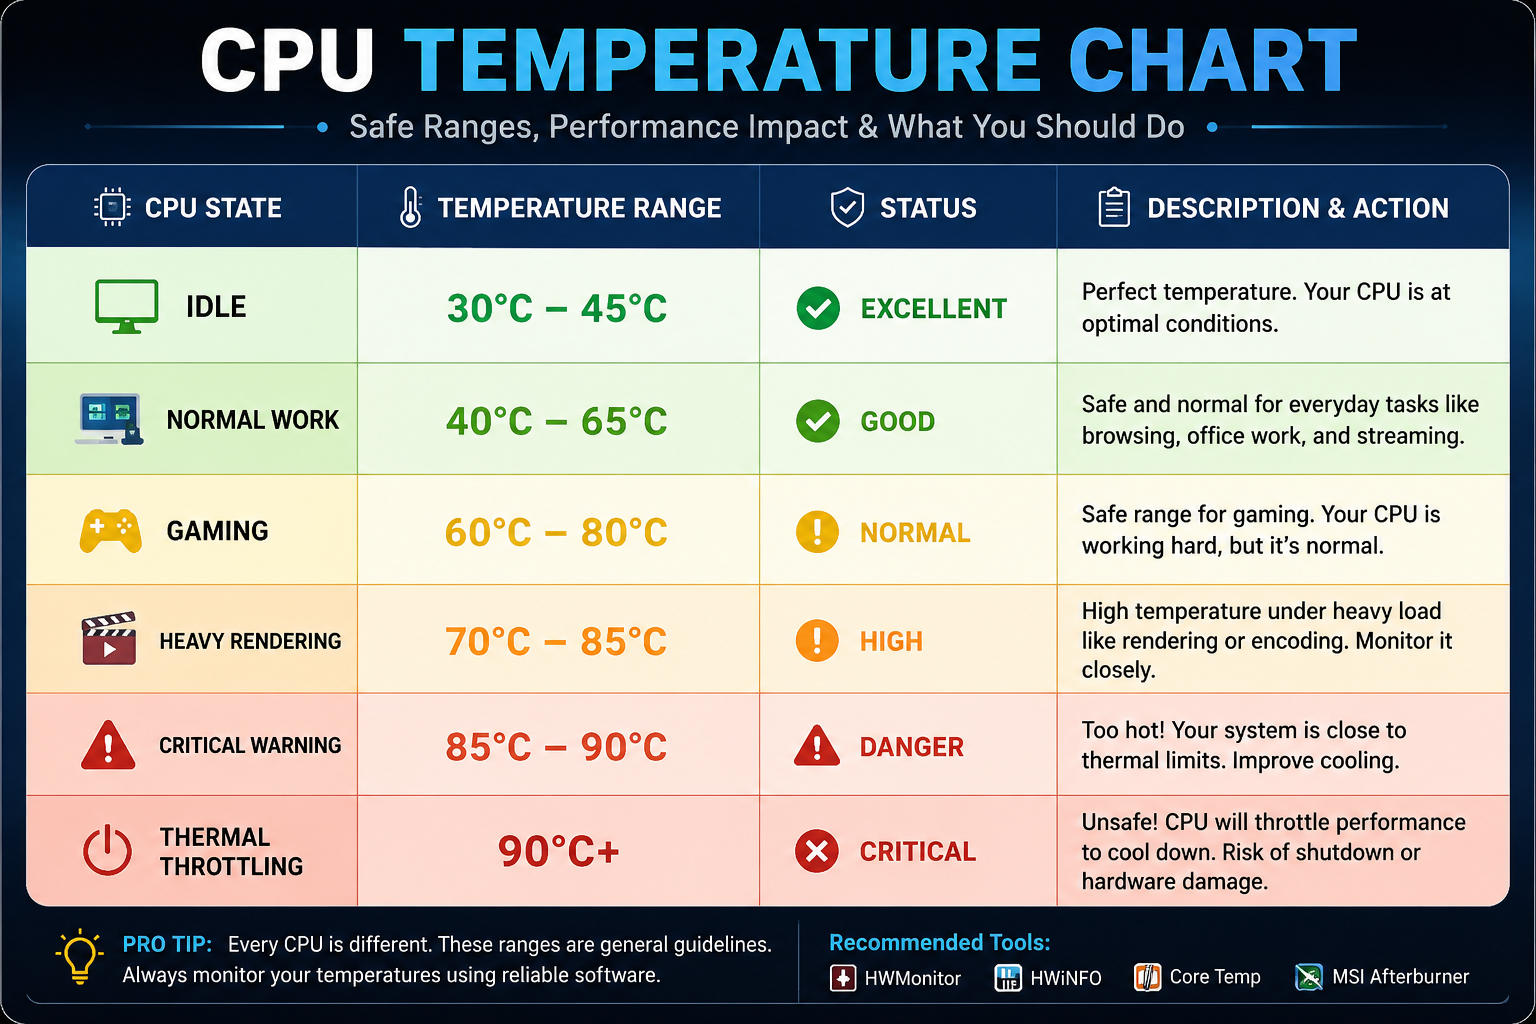
Modern CPUs are designed to operate safely at high temperatures, with TJMax typically ranging from 95°C to 100°C. While reaching these limits briefly under heavy workloads is normal, sustained high temperatures during everyday use should be avoided. Keeping your CPU cooler improves performance, stability, and longevity.
Here is a breakdown of standard desktop and laptop CPU temperature profiles:
CPU State | Temperature Range | Description & Action Required |
|---|---|---|
Idle | 30°C – 45°C | Excellent. The PC is sitting on the desktop with only basic background tasks running. |
Normal Work | 40°C – 65°C | Perfect health. Web browsing, streaming media, office productivity applications. |
Gaming | 60°C – 80°C | Completely safe. Standard thermal load for modern multi-threaded games. |
Heavy Rendering | 70°C – 85°C | Acceptable under stress. Heavy 3D rendering (Blender), video exporting, or encoding. |
Critical Warning | 85°C – 90°C | Hot. Your cooling system is starting to reach its efficiency limit. Check airflow. |
Thermal Throttling | Above 90°C | Dangerous zone. The CPU will actively downclock itself to protect against damage. |
Signs and Symptoms of an Overheating CPU
Common signs of an overheating CPU include constantly loud cooling fans, sudden performance drops or FPS stutters due to thermal throttling, unexpected application crashes, Blue Screen of Death (BSOD) errors, and abrupt system shutdowns when the processor reaches critical temperatures to protect itself from damage.
Deep Dive: The Root Causes of CPU Overheating
To fix an overheating CPU permanently, you have to accurately isolate the root mechanical or software failure. Here are the 7 most common culprits behind thermal degradation:
1. Dust Buildup Inside the PC
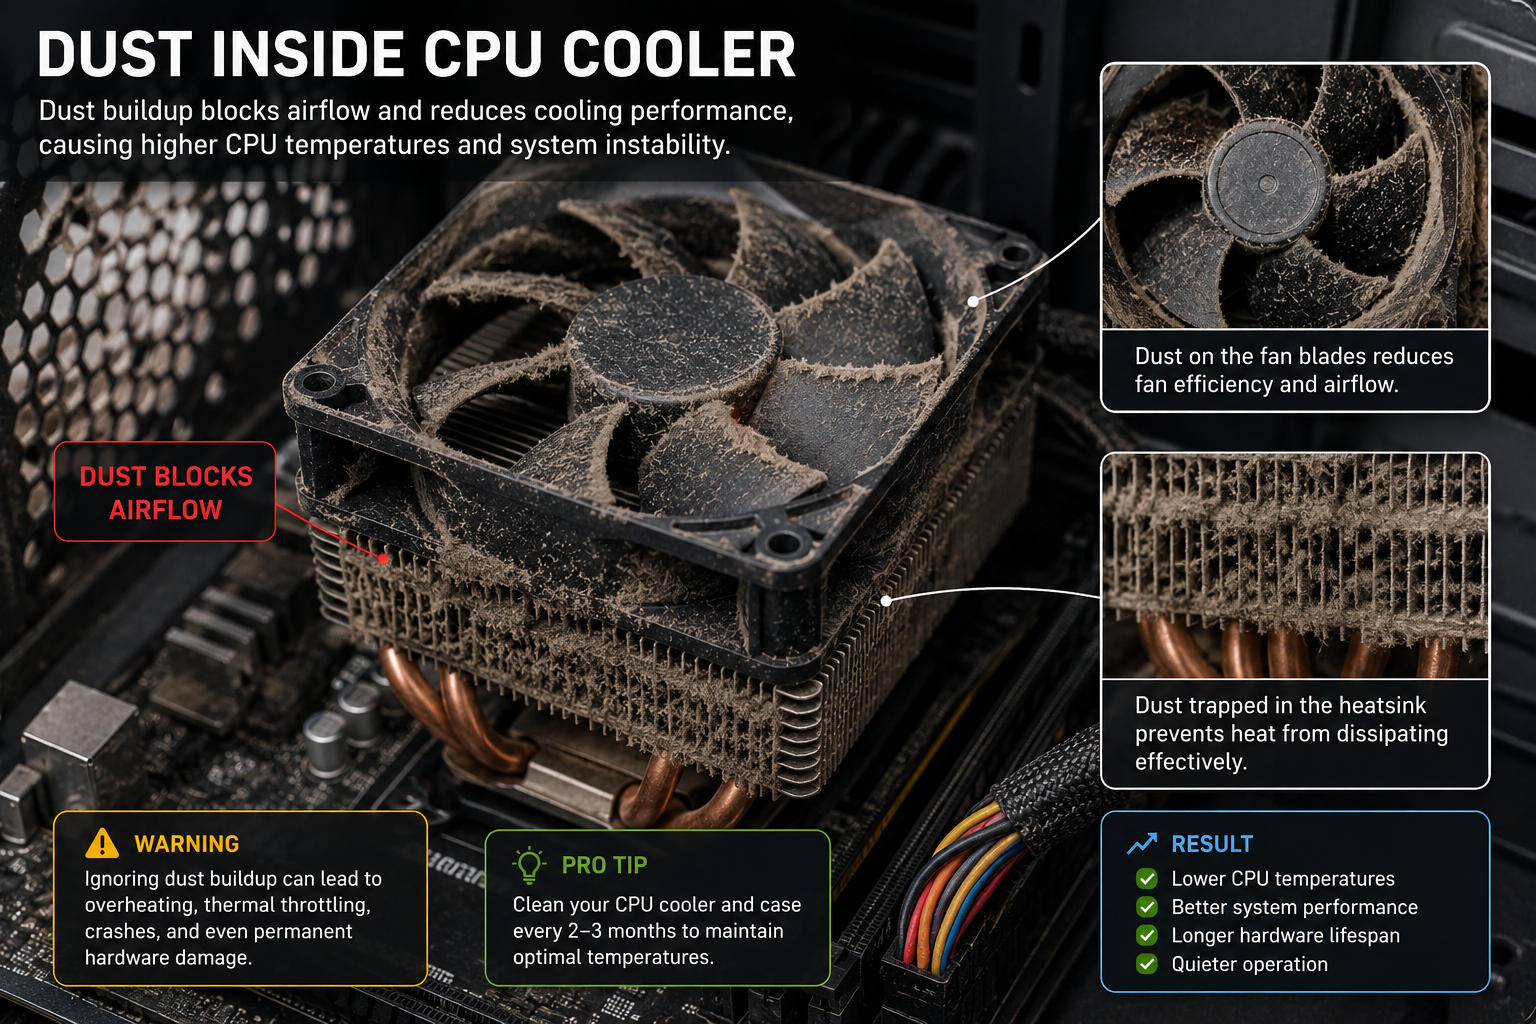
Dust acts as a highly effective thermal insulator. Over months of operation, cooling fans act like small vacuum cleaners, pulling microscopic ambient debris into the chassis. This dust settles directly onto the thin aluminum or copper fins of your CPU heatsink or the dense metal matrices of liquid cooling radiators. Once a layer of dust forms, air cannot pass through the fins, making it impossible for the heat to escape into the room.
2. Old, Degraded, or Poorly Applied Thermal Paste
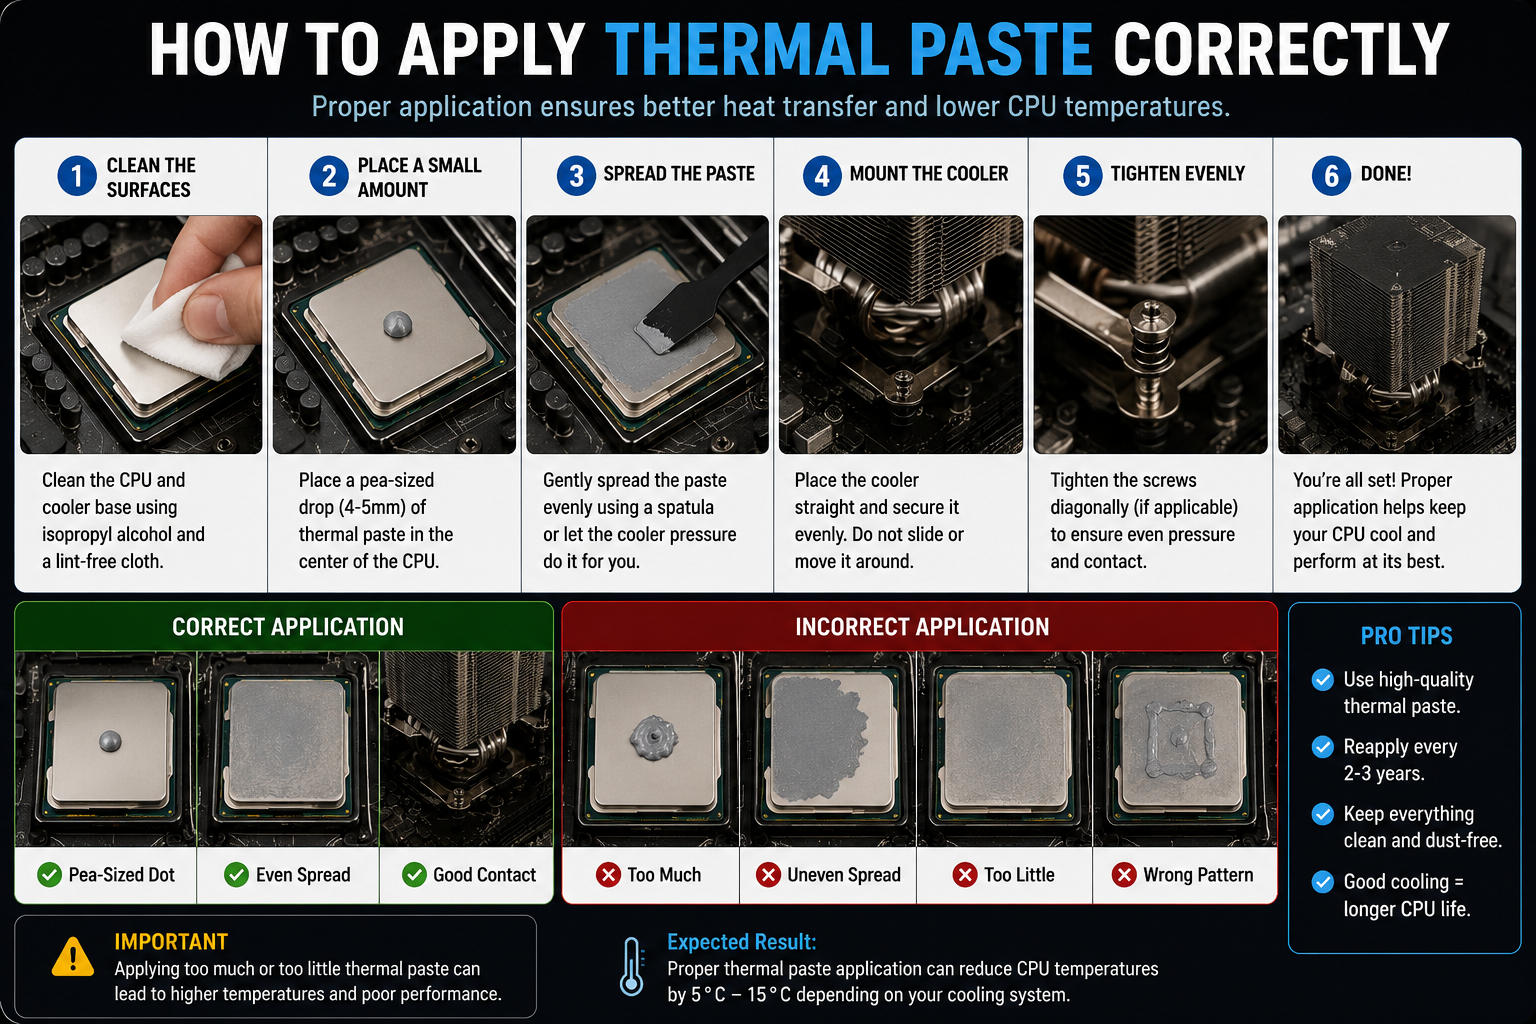
Thermal Interface Material (TIM), commonly known as thermal paste, is a compound applied between the flat metal top of the CPU (the Integrated Heat Spreader or IHS) and the base plate of your cooler. At a microscopic level, both metal surfaces are full of tiny imperfections and air pockets. Since air is a horrible conductor of heat, thermal paste fills these gaps to ensure direct conductive transfer. Over 2 to 4 years, this compound loses its wet solvents, dries up, cracks, and becomes an insulative barrier instead of a thermal bridge.
3. Poor Case Airflow and Restricted Vents
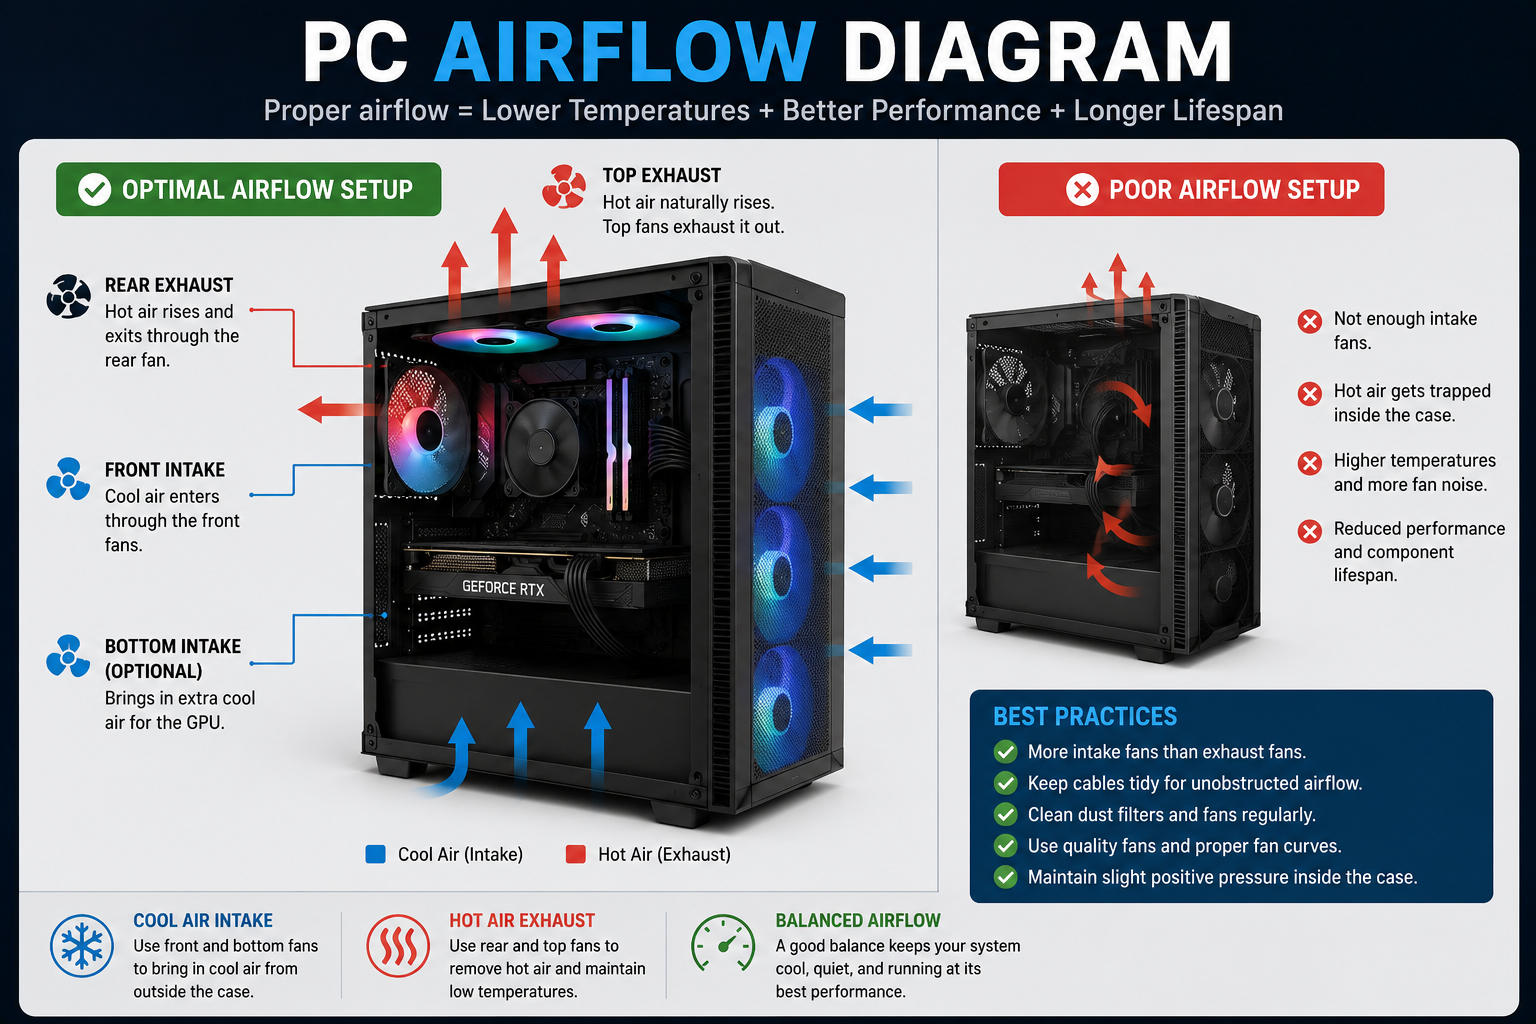
A premium CPU cooler is completely useless if it is trapped inside a closed chassis filled with stagnant, pre-heated air. Airflow requires a structured kinetic pathway. If your PC case lacks adequate intake fans, has dense front panels that block air, or is buried tightly against a wall or under a carpeted desk, hot air gets trapped. The CPU cooler ends up recirculating the same hot air repeatedly, causing temperatures to steadily climb during long usage sessions.
4. CPU Cooler Installation Pitfalls
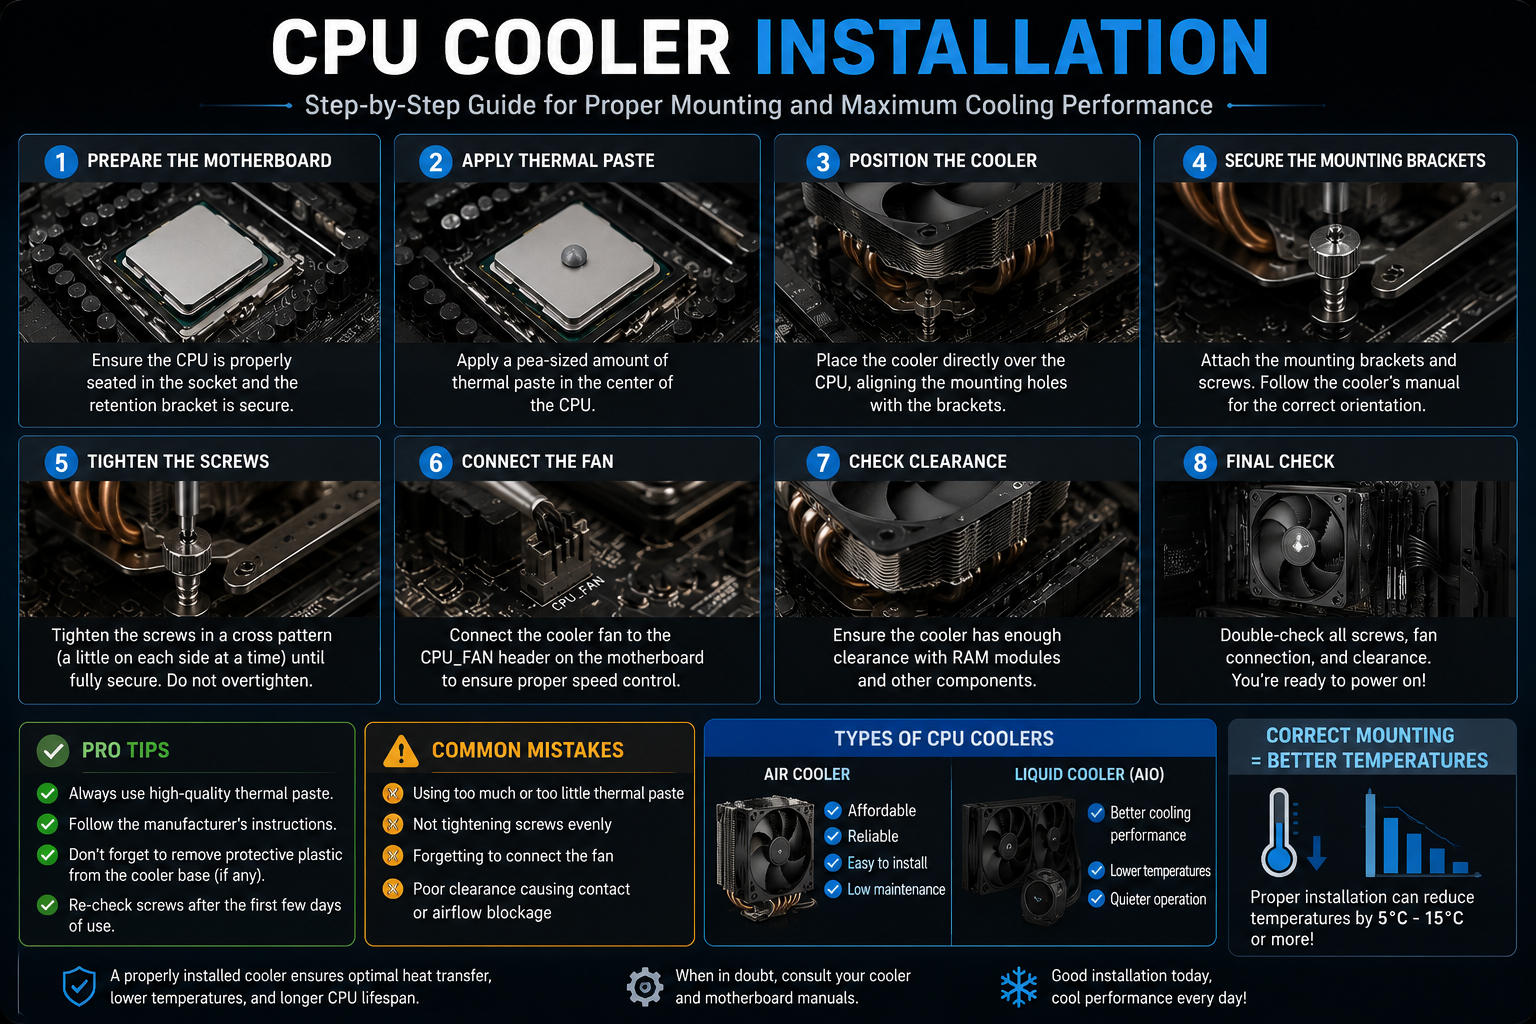
Improper installation is shockingly widespread, even among experienced PC builders. The most common errors include:
Forgetting to peel off the clear protective plastic warning sticker on the copper bottom of the cooler base before installation.
Applying uneven pressure on the mounting brackets, causing one side of the cooler to lift off the CPU surface.
Using loose or incorrect mounting standoffs intended for a different socket type (e.g., mixing up Intel LGA1700 standoffs with older LGA1200 or AMD AM4/AM5 parts).
5. High Ambient Room Temperature
Your PC's cooling performance is directly bound by the laws of thermodynamics. A cooler cannot drop your CPU's temperature below the temperature of the room air it is drawing in. During summer peaks, or in poorly ventilated, confined rooms without air conditioning, your baseline "idle" temperatures will naturally rise by 5°C to 10°C, compressing the safety margins under load.
6. Aggressive Overclocking and Volumetric Voltage Boosts
When users manually overclock their processors to extract extra performance, they increase two primary metrics: clock frequencies and voltage supply ($V_{core}$). Heat production scales quadratically with voltage. Pushing even a slight over-voltage without a high-tier liquid cooling custom loop will overwhelm standard dual-tower air coolers almost instantly.
7. Malicious and Bloated Background Software
Sometimes overheating isn't a mechanical failure; it's a software overload. Malicious background processes such as hidden cryptocurrency mining malware, corrupted browser tabs executing endless scripts, or fragmented Windows updates running indexing tasks in the background can pin your CPU usage at 100% indefinitely, preventing the processor from ever entering its energy-saving down-clock states.
Step-by-Step Guide: How to Reduce CPU Temperature
If your CPU is running hot, follow this structured, step-by-step remediation process to restore optimal operational efficiency.
Step 1: Deep Clean the Chassis and Heatsinks
Power down your system completely, flip the power supply switch to off, and unplug the AC power cord.
Move the PC to a well-ventilated area (like a balcony or garage). Remove the side panels.
Use a can of Compressed Air or a dedicated electric anti-static PC blower. Hold your cooling fan blades in place with a finger to prevent them from over-spinning, which can generate reverse electrical voltage and damage the motherboard header.
Blast out the dust from between the heatsink fins, out of the radiator mesh, and off the intake dust filters.
Wipe the fan blades cleanly with an anti-static microfiber cloth.
Step 2: Clean and Re-apply Premium Thermal Paste
If your cooler has been mounted for over 3 years, a repaste is highly recommended.
Carefully unbolt the CPU cooler bracket and gently twist the cooler back and forth to break the thermal paste suction before pulling it up. (Never yank a cooler straight up on AMD AM4 sockets, as it can pull the CPU physically out of the locked socket).
Use 99% Isopropyl Alcohol and lint-free paper wipes to thoroughly clean the old dried paste off both the CPU surface and the cooler base plate until they look like polished mirrors.
Apply a small pea-sized drop (approx. 5-6mm in diameter) right in the dead center of the CPU surface. Alternatively, use an "X" shape pattern for larger rectangular modern processors like Intel's LGA1700 or AMD's AM5.
Re-seat the cooler flatly onto the CPU and torque down the mounting screws in a diagonal cross-pattern (top-left, bottom-right, top-right, bottom-left) to ensure perfectly uniform contact pressure.
Step 3: Optimize Fan Orientation and Internal Airflow
Ensure your internal case layout creates a clear, directional wind tunnel:
Intake Fans: Front and bottom fans should always be oriented to pull fresh, cool ambient air into the case.
Exhaust Fans: Rear and top fans should be oriented to pull warm air out, expelling it away from the chassis.
Cable Routing: Tuck loose power supply cables into the rear shroud or tie them down neatly. Tangled nests of thick cables block incoming air paths and create dead zones of stagnant heat.
Step 4: Upgrade to an High-Performance CPU Cooler
If you are still using the basic aluminum "stock cooler" that came packed in the box with your processor, any modern intensive game will push it to its limits. Upgrading to an aftermarket option is a game-changer.
Premium Air Coolers (e.g., Noctua NH-D15, Thermalright Peerless Assassin 120): These dual-tower coolers offer incredible reliability, have zero risk of liquid leaks, are highly cost-effective, and can easily cool up to 200W+ processors.
All-In-One (AIO) Liquid Coolers (e.g., Arctic Liquid Freezer III, Corsair iCUE H100i): These utilize a pump to circulate liquid coolant from a block mounted on the CPU up to a 240mm, 280mm, or 360mm radiator mounted to the case frame. They offer unparalleled thermal capacity and are ideal for top-tier chips under relentless video rendering or streaming demands.
Advanced Thermal Management: Undervolting & Fan Curves
For advanced users looking to drop temperatures significantly without sacrificing performance, software optimization is the ultimate tool.
Adjusting the Motherboard Fan Curve
By default, many motherboards use a conservative fan curve that prioritizes absolute silence over cooling performance. You can change this by entering your system BIOS (by spamming DEL or F2 during boot) and navigating to the hardware monitor or fan control section (Smart Fan, Q-Fan, etc.).
Set a linear curve where your fans spin at a quiet 40% at temperatures up to 55°C.
Create a ramp up to 75% fan speed once the CPU hits 70°C.
Force a 100% emergency fan speed if the temperature hits 85°C to prevent thermal throttling before it occurs.
Processor Undervolting
Processor undervolting reduces your CPU's voltage without affecting performance, lowering power consumption and typically reducing temperatures by 5–12°C while maintaining the same clock speeds.
Best Software Tools to Monitor CPU Temperature
You cannot fix what you do not measure. Keep one of these highly accurate, free monitoring utilities installed on your system to audit your thermals in real-time.
Software Utility | Price | Key Technical Features | Best Used For |
|---|---|---|---|
HWiNFO64 | Free | Absolute gold standard. Tracks every individual internal sensor, core temperature variations, voltages, power draw, and thermal throttling flags. | Comprehensive system diagnosis and deep hardware auditing. |
HWMonitor | Free | Clean, lightweight, simple tree-view interface displaying current, minimum, and maximum value brackets. | Quick glance checks on CPU/GPU status. |
Core Temp | Free | Extremely minimalist footprint. Can sit quietly directly in your Windows system tray, displaying live individual core temperatures. | Keeping an eye on temps while working. |
MSI Afterburner | Free | Includes an advanced customizable On-Screen Display (OSD) overlay via RivaTuner Statistics Server. | Monitoring live temperatures, fan speeds, and FPS inside a video game. |
The Long-Term Risks: Can Overheating Damage Your Hardware?
A common question among anxious users is whether a few hot days can destroy an expensive processor.
The short answer is: Not instantly, but it will shorten its lifespan.
Modern silicon features highly robust protective gates. When a CPU hits its critical limit, it immediately cuts voltage and throttles down to prevent instantaneous catastrophic destruction. However, prolonged operation at near-boiling temperatures causes long-term structural issues:
Silicon Degradation: Microscopic transistors inside the CPU gradually wear down faster under intense thermal energy, meaning the chip will eventually require more voltage over time just to maintain its stock stable clock speeds.
Motherboard VRM Stress: Extreme heat spreads out into the nearby motherboard sockets and traces, putting heavy thermal stress on the Voltage Regulator Modules (VRMs) and drying out adjacent solid capacitors.
Data Corruption: Continuous thermal throttling can desynchronize data processing cycles, creating memory page fault errors that corrupt critical operating system files during writes.
Comprehensive Prevention Checklist
To maintain flawless PC thermals over the next few years, make this checklist a regular part of your electronic maintenance schedule:
Every 3 Months: Blast out dust filters and internal heatsink fins using dry compressed air.
Every 2 Years: Replace the factory thermal paste with high-tier compound (e.g., Thermal Grizzly or Arctic MX-6).
Desk Placement: Ensure your PC case sits at least 4 to 6 inches away from any solid walls, curtains, or wooden cabinet backings.
Elevation: Never place a high-end gaming PC directly onto a thick carpet floor; this chokes the bottom intake path of your power supply. Place it on a rigid wooden riser or directly onto your desk.
Software Audit: Check Windows Task Manager once a month to ensure zero rogue applications are hogging CPU resources while the computer is supposed to be idle.
Final Thoughts
An overheating CPU can be alarming, but it is rarely a fatal diagnosis for your computer. By executing regular cleaning schedules, ensuring smart directional airflow, selecting a capable cooler, and using high-quality thermal interface materials, you can easily control your hardware's temperatures. Keeping your CPU running cool not only guarantees maximum gaming performance and zero stuttering, but ensures your PC remains an efficient, silent, and reliable companion for many years to come.
Create a free account to react and start earning credits. Sign up
Be the first to comment (0)
Sign in to comment — you'll come straight back here.